Monday, October 10, 2011

Eggplant Parm Upside Down

I have been on a healthy kick for a while. So this eggplant parm is missing the parm... you can add it in a jiff and it will complete the meal. However, my version is delish, you do not need it to sit down to a quick, mouth watering meal of amazing flavors.


Shopping List:


  • 2-3 carrots
  • 2 sweet bell peppers, or 1 sweet bell pepper and other sweet Italian peppers
  • 1 bunch of scallions
  • 5-6 fresh cherry tomatoes (add as many as you want)
  • 1 tblspn of olive oil
  • 1 small can of diced tomatoes
  • Parsley Fresh, if you have it
  • Freshly dried basil
  • 1 bay leaf
  • 1/2 tblspn of red pepper flakes
  • S&P
  • 1 eggplant
  • 1 egg
  • bread crumbs
  • Italian spice mix (or you can use Italian bread crumbs.. but I like making my own.
  • Peanut oil


Putting it together:
  1. Shred the carrots (use a food processor if you have it), dice the peppers, scallions, and tomatoes
  2. Add the olive oil to a large wok or frying pan, heat it up to about medium high. Add the carrots, as they start to sizzle add the other vegetables
  3. Next, add the spices, as much red pepper as you like, anywhere from 1/8 tsp to 2 tsps. I added 2, I have been getting slowly addicted to lots of spice. Add the parsley, basil, 1 bay leaf, and salt.
  4. As things start to sizzle and soften up you are ready for the canned tomatoes, the purpose of them is to create a thick sauce so that the vegetables can finish cooking and develop great flavor.
  5. After about 5 minutes smash the tomtatoes with a potato masher.
  6. Cover on a slow gentle simmer until you are ready to eat.
meanwhile.... the eggplant
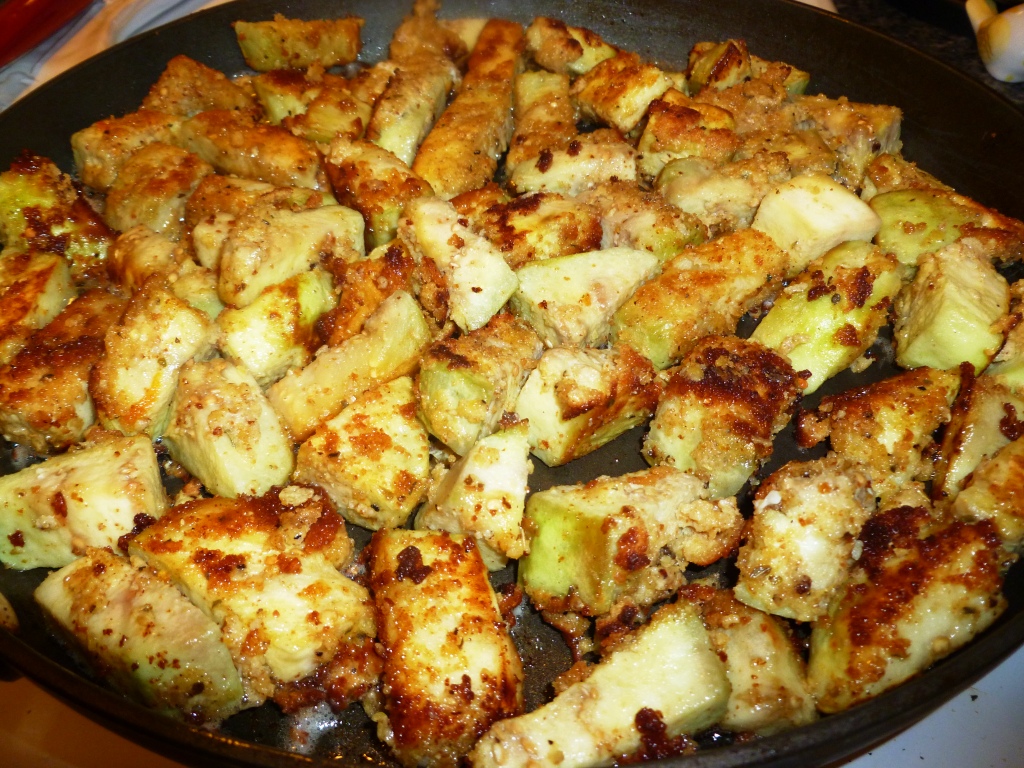
  1. Prepare your eggplant- dice it up, soak it in a salt water bath. After 30 minutes take it out and squeeze out all the water you can.
  2. Mix about 3/4 cup of breadcrumbs with 1/4 tsp salt, as much black pepper as you want, and an italian spice mix (1-2 tsps, whatever looks right)
  3. Whip up two eggs.
  4. Heat a separate skillet to medium high with just enough peanut oil to have about 1/16 - 1/8 an inch layer on the bottom.
  5. Coat the eggplant in the egg, dredge in the breadcrumbs. ( For this step I literally dumped the eggplant in the egg and mixed it around. I didn't want to deal with anything more complicate than that.)
  6. Fry on each side for about 6-8 minutes until it is nice and golden brown. If you sense it getting brown earlier, flip it.
  7. Serve and Eat! (top with Parm or Mozzarella if you want)

Thursday, September 15, 2011

Italian Twist on Ratatouille

Dave and I took Oscar, our new little mutt, to the Farmer's market to pick up that forever amazing farmshare from Isabelle farms.. a CSA I will participate in again next year. What to make? well we do have another eggplant, and we are sick of having it grilled, luckily the air started to get cold outside so stove top cooking was a great option.

Italian Ratatouille it is. A traditional Ratatouille is: Ratatouille is (from wikipedia) usually served as a side dish, but also may be served as a meal on its own (accompanied by pasta, rice or bread). Tomatoes are a key ingredient, with garlic, onions, courgettes (zucchini), aubergine (eggplant), poivron (bell peppers), carrot, marjoram and basil, or bay leaf and thyme, or a mix of green herbs like herbes de Provence.

 
Shopping List:
  • 1 eggplant
  • 6-7 cherry tomatoes
  • 1 green bell pepper
  • 2 sweet italian peppers
  • 2 fresno peppers (from the Eisele's Garden, thanks Adam & Sara!) 
  • 1 jalapeno (also from the Eisele's Garden..)
  • Okra about 10-12 of them (optional)
  • 4 scallions
  • olive oil
  • S&P
  • 1/2 tsp of thyme
  • 1/2 tsp of oregano
  • 1 tblspn of sweet whipped butter
  • 1 bunch of swiss chard 
Putting it Together:
  1. First peel and dice the eggplant and put it in a salt water bath for about 30 minutes (prep in the meantime).
  2. Clean the tomatoes, chop the all the peppers, all the okra, scallions, and swiss chard.
  3. Strain and squeeze the water out of the eggplant with a paper towel.
  4. Heat a skillet with 1 tblspn of olive oil at a medium/high, add the tomatoes, and S&P. 
  5. After they start to sizzle add the eggplant.
  6. Stir it around a few times, after about 5 minutes add the remaining vegetables except for the swiss chard.
  7. Season with a small sprinkling of S&P, half a tsp of oregano, half a tsp of thyme, the shopping list doesn't call for it, but I'd put some parsely in there for good measure.
  8. Let it sizzle for a good while until the vegetables start to cook down and add a tablespoon of sweet whipped butter.
  9. As they cook down add about 1/2 tbspn and 1/4 cup of water together and mix in.
  10. Add the swiss chard and let it cook down.
  11. (cook some pasta)
  12. As the liquids start to reduce, the swiss chard is cooked through, and the eggplant is tender you are ready to eat!
Serve and sprinkle a little basil on top, whether its fresh, freshly dried, or comes from a jar.


Wednesday, September 14, 2011

Hash Browns & Sunny-Side Up Eggs


Lots of farmer potatoes and a morning long enough to make breakfast. If you care to know the intimate details of this particular morning, I was waiting for Dave to get back from his run so we could pick up Oscar, the newest member of the Fam.

Anways.. I love home fries, don't get me wrong, but I was not in the mood to perform the laborious task of cutting them up, giving them a little pre-boil, then frying... wheels start to turn. I take out the loud-as-a-dump-truck food processor and start to spin away. Hash browns it is. So much easier, I may never make home fries again.

Shopping List:
  • Potatoes ( i used a lot of little ones, came to 4 cups)
  • 1 bell pepper
  • 3-4 scallions
  • Olive oil
  • S&P
  • Parsley
  • Cayenne ( a dash or more )
  • Eggs
  • Butter
Putting it Together:
  1. Take however many potatoes you want and put them through the food processor.
  2. Squeeze the water out twice until they are dry-ish.
  3. before the water squeeze
  4. Chop up the sweet bell pepper into a small dice and chop the scallions.
  5. Put about a tablespoon of olive oil in a skillet, heat it up at about medium/high. Add the potatoes, pepper, and scallions.
  6. Next add your spices, you really can do anything you want here, i sprinkle salt across the top, then sprinkle cracked pepper across the top, then sprinkle parsley across the top. There are no measurements, just eyeball it. If you are hesitant do a little bit. Once the potatoes are more thoroughly cooked the taste testing begins.
  7. You want to make sure to let the potatoes sit in the pan and develop a nice golden brown glow.
  8. Start mixing it around after 4 minutes, let sit in the pan, turn a few minutes to 4 minutes later. Taste.. does it need salt? pepper? cayenne? do you love garlic? add that. [ususally garlic is in the mix for me, but i just wasn't in the mood]
  9. When the hash browns look like they are crisping up and you are ready to devour them you are ready to make the eggs. In a separate skillet add about a tsp or two of whipped butter to layer the bottom of the pan. Crack your eggs, sprinkle with S&P, cook sunny side up.
  10. Plate and eat, preferably with a large cup of french pressed coffee.

Friday, September 9, 2011

Italian Grilled Chicken and Zucchini

A summer filled with deadly heat and farm share veggies galore means only one thing- I've been blasting through propane like no other. Watch out Bobby Flay, Keenie's Kitchen has moved to the patio! ...That is giving myself way too much credit, but an enjoyable thought none the less.

Another hot night, veggies were destined for the grill, my palate was craving some light poultry and a little spice. Getting tired of the usual cuisine I took some simple spices and whipped up a delightful meal, savory, sweet, and light... and a little spice.

Shopping List:
  • Chicken thighs (bone in)
  • Zucchini
  • Olive oil
  • Rosemary
  • Thyme
  • Oregano
  • Salt
  • Fresh Cracked Pepper
  • Cayenne pepper to your liking
Putting it together:
  1. Clean the chicken and cut away at the excess skin that spills over the edge. (You can remove all the skin, but come on!? it is the best part!)
  2. Mix equal parts rosemary, thyme, and half oregano.
  3. First salt the chicken, pepper the chicken, then add the spice trio, front and back- apply lightly.
  4. Heat up the grill to medium/ medium-high, put the chicken on. (it will cook for 25-30 minutes, rotate at about 15 minutes.
  5. what it looks like when i go for the first flip.
  6. Meanwhile, slice the zucchini.
  7. Lightly brush on some olive oil, then salt, pepper, cayenne it to your liking (you can see I packed on a little heat), and lightly dust with the remaining Italian spice trio.
  8. Place on the grill, total cooking time about 8 minutes, flip after 4.
  9. Walla! take it off the grill, maybe paired with some plain white rice and yummy kale as detailed in the salmon and kale recipe (click me).
  10. Eat!

Thursday, August 25, 2011

Grilled Vegetable Sandwiches with a Balsamic Twist

The theme of the summer has been grilling, this summer more than ever with the insane amount of vegetables we've been getting through our CSA... So much eggplant, so much zucchini, the biggest zooks I've seen! Not only are they massive but they aren't bitter or old tasting, so fresh and tantalizing for those taste buds.


We've had lots of eggplant lately, we are going out of town, what are we going to do? Grill them all.. with chicken nuggets! On second thought Dave says- lets make sandwiches. I said to myself, oh i don't want that. But in going along with a great idea we had a deliciously sweet and healthy dinner.


Shopping List:
  • 1 eggplant
  • 1 large zucchini
  • 1 red pepper
  • 3 cloves of garlic
  • pepper
  • salt
  • balsamic vinegar
  • olive oil
  • bread 
  • mozzarella
  • mayo
  • bread
Putting it together:

1.   Peel, slice, and soak the eggplant in a salt water bath. Soak for 20-30 minutes
2.   Meanwhile slice the zucchini cut the pepper in half and press flat with the palm of your     hand.
3.   Press the garlic.
4.   Mix the zucchini, eggplant, red pepper and garlic in a big dish. You don't have to measure the rest, just douse the veggies with balsamic vinegar and oil, season with salt and pepper. Mix it together with your hands.


5.   Grill on medium high for about 3-4 minutes on each side.

6.   Slice your bread, layer on mozz and mayo (thin layer of mayo).
7.   Build your sammie and chow down!

Wednesday, August 17, 2011

Oreo Cheesecake Cupcakes (but Newman-O's instead)

I was innocently working one day, yes, I was working, when my co-worker pings me with a link to a blog like none I've seen before (click me). It was full of desserts, this was the first one I saw. A variation of Martha Stewart's Oreo cheesecake cupcakes. Instead of crushing all the Oreos and folding them in, one full Oreo was placed at the bottom with the cream cheese filling covering the top. Wow. Dangerous, daring, delicious... A few weeks later came the perfect excuse to make something I otherwise wouldn't have dared let enter my "dieting" kitchen. A surprise party for the best dessert chef I know, and fellow blogger (click me too).


My local grocery store doesn't carry the Oreo brand, instead we get Newman-O's (try them if you've never had them, AMAZING). With really the only variation to the recipe this is how it turned out....


Shopping List:
  • 42 Newman-O's (Crush 12)
  • 2 pounds cream cheese
  • 1 cup sugar
  • 1 teaspoon vanilla extract
  • 4 eggs
  • 1 cup sour cream
  • 1/4 teaspoon salt
Putting it Together:
  1. Coarsely chop 12 Oreos, I used the elusive Slap Chop. (Loved it!)
  2. Let the cream cheese set to room temperature, once at room temp., beat it until smooth. If you have a mixer use the paddle blade, if you do not have a mixer get that arm warmed up and mix it with a strong wooden spoon (like me).
  3. Once the cream cheese is smooth add the sugar, it will get a lot easier to mix (if mixing by hand) as you add the sugar.
  4. Next incorporate the vanilla.
  5. Add the eggs, two at a time and blend in completely.
  6. Blend in the sour cream and salt.
  7. Finally, fold in the crushed Newman-Os
  8. Preheat the oven to 275.
  9. Line your cupcake trays with the cupcake wrappers and place a Newman inside each one. I only had room for 24, but you can make up to 30.
  10. Scoop the filling on top, just about to the top, showing a little edge.
  11. Cook for about 20-25 minutes, you want them to just puff up a little bit.. they will not brown nor do you want them to.
  12. Remove from the oven, cool on racks, when completely cool store in tupperware in the fridge for 4 hours to overnight.
  13. Devour!!

Thursday, August 11, 2011

Sweet Soy Salmon and Spicy Collard Greens

I have been trying to eat healthy for a while now, and I keep recycling flavor combinations, but these ideas of mixing and matching creates endless opportunities for wonderful flavorful meals that don't leave you thinking you had it yesterday.  This night's dinner adds an Asian influence to a basic fish and greens dinner.

Some local farm fresh collard greens and some salmon probably imported from somewhere far away making the carbon footprint depressing high, yet delicious, are the major components for a Sunday night dinner or weeknight supper!

Shopping List:
  • Salmon - (I prefer the farm raised Salmon, sadly.. Ocean fresh salmon is too fishy for my palate.)
  • 1/4 cup soy sauce
  • 3 cloves of garlic
  • 1 larger bunch of scallions
  • fresh cracked pepper
  • One large bunch of collard greens
  • 1 tblspn of butter
  • 1-2 tsps of red pepper flakes
  • Salt
  • Fresh basil (if you can get thai basil all the better)
Putting it Together:
  1. Mince the garlic and scallions.
  2. Take a quarter of the garlic and a third of the scallions and combine with the soy.
  3. Salt and pepper the Salmon then add the soy marinade on top making sure to keep the good stuff on top of the fish. Let this marinate for 30-45 minutes.
  4. In the meantime (start some rice if that's what you want as your starch, and..) prepare the collard greens, cut off the hard ends and take the time to slice out the thick ribs. It is an extra step that is well worth the effort.
  5. Chop the greens into a size you are willing to eat.
  6. When you are ready to heat up the grill (to medium) you are ready to start the collard greens (collard greens take longer than other greens you may be used to cooking with).
  7. Heat your skillet to medium/ medium-high (7.5), and add the butter, as it is melting add the garlic and onions. Stir it around so it is a little sizzly.
  8. After about 60-75 seconds add the red pepper flakes.
  9. As the mixture turns a more clear color add the collard greens, incorporate the flavors at the bottom and cover. You want to make sure you cover it so the natural moisture recirculates and cooks the greens.
  10. Turn the stove top down to medium.
  11. You will occassionally stir the greens as they cook.
  12. Meanwhile gently plop the salmon on the heated grill and cover it up. Watch the salmon carefully, it will probably take 15-18 minutes depending on how big your piece is. Start checking at 10 minutes (unless you have small filets).
  13. Hopefully everything is done at about the same time, top the fish with fresh basil, plate and chow down!

Wednesday, August 10, 2011

Grilled Balsamic Portabellas

We had a trip to my favorite store and found the best looking pack of portabellas, they were so perfect I couldn't resist. Four fresh, firm, and fierce mushrooms landed in my cart. Two days later I was ready to fire up the grill and mix some of the fresh farmer's market CSA veggies mix and mingling on the hot grates. Dave was making a new recipe for goat cheese beets (not today guys.. but it will post eventually) and the Keenie Kitchen was in action.


Now before we got to the kitchen I was thinking about how to get these portabellas to be juicy and sweet. I was reflecting on how sour I have found balsamic vinegar lately, maybe Costco failed me and it was just cheap, maybe it started to go bad, but regardless I wasn't satisfied. What about balsamic dressing? That is typically sweeter and a little more delicious. At the market I picked up a nice bottle of balsamic dressing and went home to prepare for my feast.


Now I can begin...


Shopping List:

  • 1 Portabella per person
  • Balsamic dressing (one you like, or one that looks irresistible)
  • 1 red pepper ( half a pepper per person)
  • Fresh Mozzarella
  • Either a buns or fresh Italian bread
  • Fresh basil
Putting it Together:
  1. Turn the portabellas with the cap side down, fill the belly with a healthy dose of dressing and let marinate for about 20 minutes.
  2. Meanwhile cut the pepper in half and squish flat with your hand. (cut up any other veggies for grilling)
  3. Fire up the grill to medium hot.
  4. Put the portabellas on with the cap side still down, and throw (or place) the red peppers on along side.
  5. Grill both the peppers and mushies on each side for 5 minutes, when you flip the portabellas it will fire up the flames as the dressing is lost (a little less time if your caps are smaller).
  6. In the last minute, toast the bread on the grill.
  7. Bring all those wonderful veggies off the grill.
  8. Peel the chard skin off the red peppers
  9. Begin the assembly! Layer the mushroom, your freshly roasted red pepper, mozzarella, and a sprinkle with a little fresh basil.